
Find out what to expect on your round of golf with our handy hole guide. Our pro golfers give useful insight into each hole on the course.
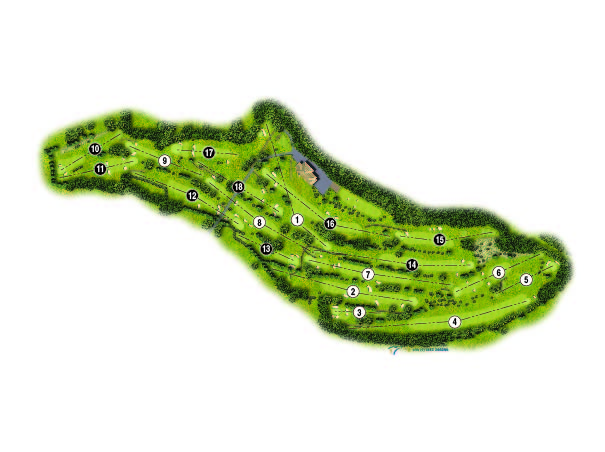
1st Hole
White Tees- Par 4 – 326 yards
Yellow Tees – Par 4 – 320 yards
Red Tees – Par 4 – 308 yards
Don’t let this opening hole that doglegs slightly right to left frighten you as a well placed tee shot just left of the maker will leave you with a relatively short approach shot to the green. Ideally, you will need to be on top of the plateau to get a clear site of this green.
2nd Hole
White Tees – Par 4 – 414 yards
Yellow Tees – Par 4 – 404 yards
Red Tees – Par 4 – 359 yards
An exceptionally good par 4 which requires a very precise tee shot for you to hit the fairway. A leaked tee shot right will almost certainly leave you bunkered so you really need to favour the left side of this fairway. Your second shot to reach this green safely must be committed. This is probably the biggest green on the course so as always at Chipstead a three putt may await.
3rd Hole
White Tees – Par 3 – 131 yards
Yellow Tees – Par 3 – 125 yards
Red Tees – Par 3 – 119 Yards
This is Gary’s favourite hole on the course even though it’s the shortest. It goes to show that golf holes don’t have to be long to be difficult to play. This well guarded par 3 has menacing bunkers awaiting any misguided tee shot. The sloping narrow green means that precision is key. If you miss this green your short game skills will be tested to the full.
4th Hole
White Tees – Par 5 – 523 yards
Yellow Tees – Par 5 – 483 yards
Red Tees – Par 5 – 472 yards
Chipstead’s 4th hole could possibly provide the skilled golfer with a birdie as it’s not the longest of par 5s. That said, this hole will cause you many problems if you leak shots to the right as out of bounds awaits. Keep your ball left at all times if you want to make an easy par or birdie on this hole.
5th Hole
White Tees – Par 3 – 179 yards
Yellow Tees – Par 3 – 173 yards
Red Tees – Par 3 – 149 yards
This demanding par 3 played from an elevated tee requires the most accurate of tee shots to land in the perfect spot. Otherwise, a demanding bunker at the back of the green will cause problems. Club selection is key to making a good score on this hole and short is better than long.
6th Hole
White Tees – Par 4 – 265 yards
Yellow Tees – Par 4 – 262 yards
Red Tees – Par 4 – 254 yards
Don’t be fooled by the yardage on this hole, a blind tee shot up the hill is demanding enough but four bunkers await any misguided tee shot. This hole also has a raised green that slopes very slightly front to back making any approach shot difficult.
7th Hole
White Tees – Par 4 – 409 yards
Yellow Tees – Par 4 – 408 yards
Red Tees – Par 5 – 400 Yards
This par 5 for ladies and par 4 for men is seen as the hardest hole on the course. It demands you to target the left half of the fairway but, be careful of the fairway bunker.
Bunkers protect both sides of the green and any miss-hit shot will almost certainly find two fairway bunkers some 50 yards short of the green. If you make par at this hole you really have done well.
8th Hole
White Tees – Par 4 – 355 yards
Yellow Tees – Par 4 – 345 yards
Red Tees – Par 4 – 339 yards
A slightly wider fairway but once again well protected by trees down the right and bunkers to the left. Once finding the fairway, make sure your approach shot is hit to the left half of this green as the green slopes left to right. A flag position on the left side of this green is always hard to get close to.
9th Hole
White Tees – Par 3 – 218 yards
Yellow Tees – Par 3 – 204 yards
Red Tees – Par 3 – 181 yards
The start of Chipstead’s Amen Corner and arguably the toughest of the par threes. A slight sloping left to right fairway makes this really difficult for those who can’t carry the ball all the way to the green. Two green side bunkers make the entrance to this green very tight and only a perfect tee shot will find the putting surface. A par on this hole always feels like a birdie.
10th Hole
White Tees – Par 3 – 196 yards
Yellow Tees – Par 3 – 193 yards
Red Tees – Par 3 – 188 yards
This is a wonderful golf hole that looks fairly straight forward but with out of bounds left of the green and behind the green you better make sure that you have the right club in your hand. A pulled tee shot on this hole will almost certainly see you produce a big number. Many have found that one less club is the answer to a safe passage on this par 3.
11th Hole
White Tees – Par 3 – 223 yards
Yellow Tees – Par 3 – 219 yards
Red Tees – Par 3 – 211 yards
Again another tough par 3 where a precise and long tee shot is required to find this green. Surrounded by bunkers and hedgerows there are some that would say that this is the toughest of our par 3s but there’s always a good chance of a chip and a putt if your slightly short but online at this hole.
12th Hole
White Tees – Par 4 – 327 yards
Yellow Tees – Par 4 – 315 yards
Red Tees – Par 4 – 301 yards
The 12th may look simple to the first time player but as the locals will know you must take care if you want to keep your scorecard intact. A left to right tee shot short of the fairway bunker is the best approach as there is out of bounds all down the right hand side of this challenging par four. A good tee shot should leave you a fairly short iron to a fairly long green. This hole is really all about the tee shot.
13th Hole
White Tees – Par 3 – 175 yards
Yellow Tees – Par 3 – 166 yards
Red Tees – Par 3 – 156 yards
The last of our par 3s but one that provides a different challenge, again this is a hole that requires local knowledge as the hole never really plays its full yardage. A top tip for playing this hole is to land the ball 5 – 10 yards short especially during the summer months. A well bunkered green will pick up any loose shots left or right.
14th Hole
White Tees – Par 4 – 447 yards
Yellow Tees – Par 4 – 436 yards
Red Tees – Par 4 – 381 yards
A really solid par four with a fairway sloping from right to left will require you best tee shot of the day to take advantage of this hole. A small green that has a left sided bunker will await your approach. The second shot into this green must come in from the right but remember anything over the green will almost certainly bring trouble.
15th Hole
White Tees – Par 4 – 287 yards
Yellow Tees – Par 4 – 260 yards
Red Tees – Par 4 – 247 yards
This is Nic’s favourite hole. This picturesque hole, short on the card but playing slightly longer than its yardage due to its incline, is one to treat with respect. Its sloping fairway from left to right is designed to cause you problems with bunkers lining the right hand side of the fairway and out of bounds beyond that. Once again you will be required to place your tee shot in order to gain the biggest rewards. With a good ball off the tee you’re not done just yet. With a deep bunker which guards the front right of the elevated green, accuracy with the short second shot is a must. Keep it at the oak tree on the left and club up at all times is our suggestion, regardless of how tempting the flag location may be. That bunker is notorious for swallowing golf balls and ruining hard earned scores.
16th Hole
White Tees – Par 5 – 440 yards
Yellow Tees – Par 5 – 415 yards
Red Tees – Par 5 – 389 yards
Our final hole on paper looks a fairly easy par 5 based on its yardage but with trouble both left and right off the tee shot and a hard sloping fairway from left to right it’s anything but. Every shot you play at this hole will test your golfing ability. Bunkers surrounding a long sloping narrow green will make this target a hard one to find in two shots.
17th Hole
White Tees – Par 3 – 149 yards
Yellow Tees – Par 3 – 141 yards
Red Tees – Par 3 – 133 yards
A tricky little par 3! Two large bunkers stare you straight in the face ready to swallow any ball slightly miss hit. Beyond them is an undulated putting surface guarded by sand and grass bunkers. An accurate shot and a solid putting stroke needed! Par is always a great score.
18th Hole
White Tees – Par 4 – 269 yards
Yellow Tees – Par 4 – 261 yards
Red Tees – Par 4 – 254 yards
A green that’s reachable for the bigger hitters but well guided by bunkers. Although this should be a birdie or an easy par it’s amazing how many people make bogey at this hole. A sloping green from right to left causes many problems for those who don’t have the pace of these greens.
